Potato, Rosemary and Garlic Oil Focaccia
This gorgeous recipe and imagery is brought to you by our talented friends over at Smor Kitchen!
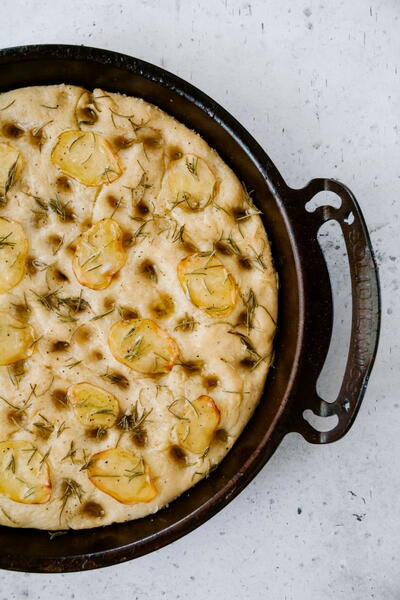
"In the past we've baked our focaccia's on a baking tray, but Solid Teknics pans are renowned for their even heating, which is really important when baking. And usually we do our focaccia dough proving in a bowl and transfer the dough after the second prove to a baking tray, but for this recipe, we decided to do our second prove in the BIGGA Pan, and it worked perfectly - you'll see below. It's a small tweak but for us, it's a game changer as it allows the focaccia to mould into the shape of the pan. I think what I loved most about baking our focaccia in this pan is watching the olive oil bubble in the dough holes in the oven, and enjoying the oily crunch on the bottom and top of the focaccia." Jaharn, Smor Kitchen
Equipment
- Measuring cups
- Stand mixer
- Baking tray or skillet
- Knife or mandalin
Enter to win the SolidTeknics US-ION Skillet Bundle Giveaway as part of our 30 Days of Christmas Giveaway as well as our 30 Days of Christmas Sleigh of Prizes Grand Prize!
Serves4 people
Preparation Time1 hr 30 min
Cooking Time - Text20-30 minutes
Ingredients
- 1 sachet of active-dry yeast (7 grams)
- 1 1/3 cup of warm water
- 3 1/2 cups of all purpose flour
- 1/4 cup garlic infused olive oil, plus more for drizzling
- 1/4 cup olive oil or olive oil spray
- Sea salt (we love Maldon Sea Salt)
- Fresh sprigs of rosemary
- Cracker pepper
- 2 potatoes, finely sliced
DIRECTIONS
-
In a bowl add the warm water (you don't need a thermometer - just make sure it's not hot or cold), sprinkle the yeast on top and give it a quick stir to mix it in with the water. Let the yeast sit for 5 to 15 minutes until you can see the yeast activate and bubble in the water. It's so beautiful to watch!
-
Using a mixer, set it to a low speed and pour in the yeast water. Gradually add the flour, garlic infused olive oil and 2 tablespoons of sea salt. It's really important you use natural flaked sea salt for maximum flavour. Continue mixing for until the dough is pulling away from the sides. If the dough is still sticky, don't be afraid to add in an extra 1/4 cup of flour whilst it's mixing.
-
Once you're happy with the consistency of the dough, remove it from the mixing bowl and shape it into a ball using your hands (don't put the dough on a surface of any kind).
-
In a separate bowl, grease the sides with a splash or spray of olive oil, then place the dough into the bowl. Cover the dough with a thin layer of olive oil to stop a crust forming while it's proving, and cover the bowl with a damp tea towel.
-
Place the bowl in a warm location (such as a window or a laundry) and let it rise until it's doubled in size. This proving process can take anywhere between 45 to 60 minutes depending on how warm a day it is. If it's a cooler day, you may need longer proving time.
-
Whilst the dough is proving, preheat your oven to 200° Celsius.
-
Pour lashings of garlic infused olive oil onto your baking tray or skillet. Once the dough has risen, place it onto your oiled baking tray or skillet, and pull the dough out until you've reached your desired thickness, or the edges of your baking tray or skillet. Some people like their focaccia thin, others like theirs thick. We are somewhere in the middle - about an inch and a half. Cover the dough again and let it rise again for another 30 minutes, or until it doubles in height.
-
Once the second proving is done, use your fingers to poke deep dents into the dough all over the surface of the dough.
-
Drizzle lots of garlic infused olive oil onto the surface making sure it gets into all of the holes, then place the slices of potato on top.
-
Sprinkle the dough with fresh rosemary needles and generously season with flaked sea salt and cracked pepper. And add extra lashings of garlic infused olive oil for good measure. It's essential!
-
Bake for 20 to 30 minutes in the oven, or until the dough is slightly golden and cooked through. We actually love ours a little crunchier on the top.
-
Pour more lashings of garlic infused olive oil on top, slice and serve warm! This is a bread which only lasts a couple of days or so, so get in there and devour it all up. Enjoy!
Read NextCake Mix Banana Bread

