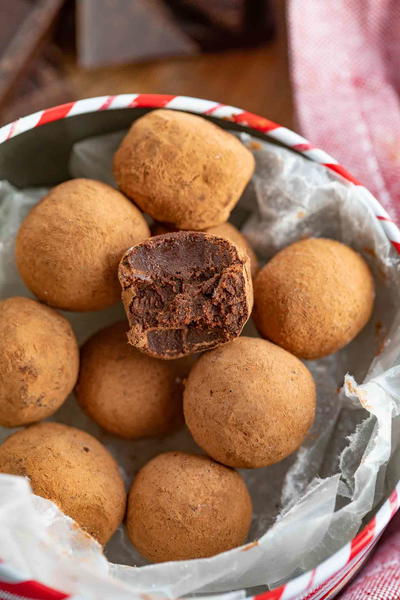
Cutest Corgi Butts

These squishy corgi butts were the first marshmallows I ever made. Still to this day, I think these are one of my favorites!
The trickiest part of these marshmallows is to make the small details, such as the paws and tail, stand out. If your marshmallow mixture is too soft, the paws and tail of the corgi will just blend in together with the rest. If this is the case, let the mixture sit for few minutes until it becomes thicker again. I recommend testing it first to check the consistency before piping the paws and tail onto the marshmallows. Once you pipe them onto the marshmallows, it will be very difficult to correct them.
TOOLS:
- Baking sheet
- Parchment paper
- Dough scraper
- Baking scriber or toothpicks
- Small soft paintbrush
Yields24 to 26 marshmallows
Ingredients
- Pink (or light beige), brown and orange gel food coloring
- Cornstarch
DIRECTIONS
Prep the colors
-
LIGHT PINK:
Take 1 tablespoon (15 g) of the marshmallow mixture and add 1 drop of pink gel food coloring to create a very light pink color. Alternatively, use 2 drops of light beige gel food coloring. Mix in the color, using a small spoon, then transfer to a piping bag and set aside. Divide the remaining marshmallow mixture equally between two separate mixing bowls, to make the following colors.
-
ORANGE-BROWN:
To one portion, add 2 drops of brown gel food coloring and 3 to 4 drops of orange gel food coloring. Mix in the color, using a spatula, then transfer to a piping bag.
-
WHITE:
Divide the second portion between two piping bags: one-third into one piping bag (No. 1) and the other two-thirds into a different piping bag (No. 2). This part does not require any food coloring as it remains white.
Pipe the design
At some point, you will notice the marshmallow mixture has set. When this occurs, you’ll need to soften it. To do this, just heat it in a microwave for 2- to 3-second intervals (it is important that you do not heat it in longer intervals). Between intervals, make sure to mix with a spatula or use your hands to massage the mixture in the piping bags until it is soft. Be careful not to overheat it!
-
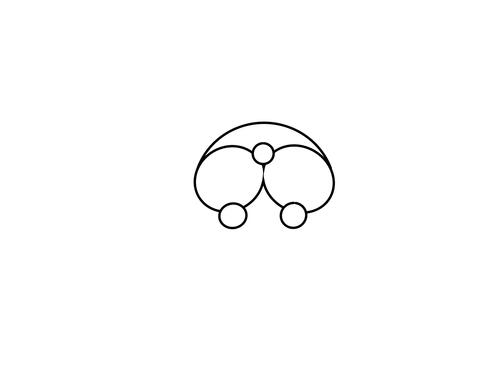
Line a baking sheet with parchment paper, cutting away any excess. Cover with a thin layer of cornstarch to a scant ¼-inch (6-mm) depth. Use a dough scraper to even out the cornstarch, so you have an even surface to work on. For this recipe, you should make only two corgi butts at a time so the orange-brown (the upper part) and white marshmallow mixture (for the butt cheeks) can blend in together while the marshmallow mixtures are soft.
-
Cut a scant ¼-inch (6-mm) opening at the tip of the piping bag of the orange-brown marshmallow mixture. Pipe the upper part of each corgi butt directly onto the cornstarch, about 1½ inches (4 cm) in width and ½ inch (1.3 cm) in height.
-
Cut a ½-inch (1.3-cm) opening at the tip of piping bag No. 2 of the white marshmallow mixture. Use this to pipe the butt cheeks. Use a baking scriber to blend both the white and orange-brown parts together. The corgi butts should be about 1½ inches (4 cm) in height and in width.
-
Then, cut a scant ¼-inch(6-mm) opening at the tip of piping bag No. 1 of the white marshmallow mixture and pipe on the feet.
-
Use the orange-brown marshmallow mixture to pipe a tail onto each butt.
-
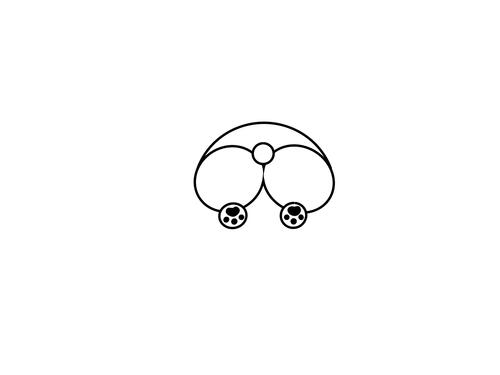
Lastly, make a tiny cut at the tip of the piping bag of light pink marshmallow mixture to pipe on the paw pads onto the feet. There you have it! Two cute tiny corgi butts. Repeat until you have made all 24 of your marshmallows. If you can't fit all 24 marshmallows onto your tray, make them in batches of 8 or 12 at a time.
-
Once you are done making the corgi butt marshmallows, carefully cover on all sides with the remaining cornstarch, using a spoon and a clean, soft paintbrush to pat it in. Make sure they’re fully covered and let them sit for 10 minutes.
-
After 10 minutes, brush off the excess cornstarch, using your paintbrush, and transfer the marshmallows to a plate to air-dry for about 2 hours before storing them in an airtight container.


Read NextStrawberry Lasagna