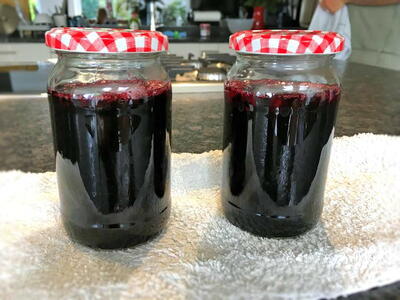
Old-Fashioned Blackberry Jelly
Learn how to make blackberry jelly the old-fashioned way with this vintage recipe.
Editor's Note: "Learning how to make jelly can be incredibly useful when spring and summer roll around — not to mention delicious. This Old-Fashioned Blackberry Jelly tastes best when using wild blackberries and gathering them is perfect excuse to spend some time outdoors. An old-fashioned recipe like this is a great activity to do with kids — they'll especially love helping to gather the blackberries! If you're looking for a way to use up your fresh berries before they go bad, then this blackberry recipe's for you. We invited our friend Anna from CuisineFiend.com to share her advice and lovely recipe with you. Enjoy!"
This must be the ultimate dream recipe: only two ingredients. It’s so easy it practically makes itself. And the main ingredient is FREE.
What are brambles?
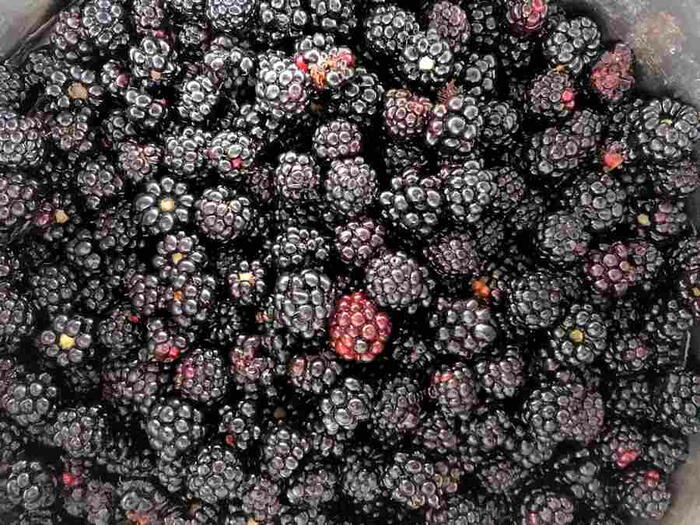
‘Brambles’, as we call them in England, are wild blackberries commonly growing in eastern North America and on the Pacific coast. They are of course widely cultivated as well, but – unless you’re the gardener and even then, there are overheads – they don’t come free!
Wild blackberries start in late August and continue into October, weather and fellow foragers allowing. They peek through hedges, line fields and meadows, and spring up along the woodland paths and by the side of the roads.
Thorny enough not to be messed with – they will grab at your clothes and hair with the power of original barbed wire. Foragers: don gloves.
As most wild fruit, compared to their cultivated counterparts, wild blackberries are tangier, harsher and less sweet than garden blackberries. They also have quite a tough core that the berry is hard to pull off, unlike in their farmed cousins and raspberries.
The sweetest blackberries are the ones eaten straight off the plants, your fingers pricked with thorns and stained with the juice, when only one in four lands in the collecting tub.
But that’s what picking your own fruit is all about, and wild blackberries are the ultimate ‘pick-your-own’ – there is no checkout till at the end of the picking!
Forager's dream
Foraging seems daunting to an average town dweller. You have to know where to go and when to go there! You have to recognise what’s edible and what’s poison! And then how to prepare and use your crop! And there’s no use-by date on it!
I agree that picking wild mushrooms requires substantial knowledge, though I’m saying it with a smug sense of superiority, having grown up in a family of seasoned mushroom foragers in continental Europe.
The same difficulty goes for ramsons (wild garlic): it masquerades as lily-of-the-valley and its season lasts all of about five minutes.
And I don’t know much about blackthorn or elderflower - trees are generally intimidating.
So wild blackberry picking would be the nicest and the most rewarding type of foraging since they are plentiful and in plain view. It would – if it wasn’t for the pips.
.. but for the pips!
Even if you aren’t the spoilt type who goes for seedless raspberry in the preserves aisle, wild blackberries are REALLY pippy. I grudgingly go for cultivated blackberries in cakes – rich flavour, palatable pips.
For jamming though, shop bought fruit is usually too expensive even if you want to make just a couple of jars. And thus wild blackberries are the supreme jamming material that comes for free, by way of an enjoyable afternoon of picking.
Why bramble jelly, not bramble jam?
To clarify the jam-jelly confusion first of all, what I and the rest of the UK know as ‘jam’ is the preserve with full or mashed up fruit pieces. ‘Jelly’ on the other hand is the clear preserve that wobbles.
So if you allow me, I’ll use those terms to describe my preserves, very well aware that for at least some of you readers out there my ‘jam’ is your jelly.
But hey! who cares what it’s called if it’s gorgeous and practically free, right?
Anyway, making jelly is quite similar to making jam except it works particularly well with pippy fruit like blackberries. The jelly my recipe is for, is basically seedless jam rather than jellied fruit juice.
Adding gelatine to fruit juice is just WRONG, after all that organic effort of picking. Pectin is the natural gelatine, occurring freely in fruit and thus giving jams and jellies the setting quality.
For jelly-making, I thought you couldn’t get away without one of those scary wasp nest-like contraptions suspended half a mile above a collecting jar, but you can easily make do with a colander and muslin cloth.
Blackberries should be washed before processing, especially if growing near roads, to get rid of dust and pollution. If you collected them in the heart of the countryside and managed to avoid little insects living on them, you can skip the washing. Add a splash of water to the cooking in that case.
They need to soften, without any sugar initially, for about twenty minutes at a simmer. And then the fun starts.
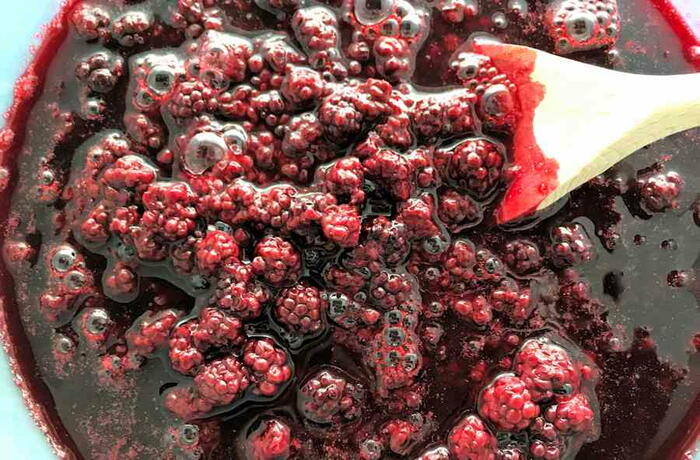
Drip, drip, drip goes the blackberry jelly
A colander or a large sieve, set over a large pan with enough clearance for juice to drip freely, lined with a double layer of muslin cloth – that’s all that’s needed.
In theory, it should be an organic drip overnight, no squeezing of the bag for maximum extraction, for perfectly clear jelly.
But if, like me, you are a/ far too greedy for that and b/ aim at smooth but pulpy consistency, give the muslin a good old squeeze before discarding the pulp the next morning. Anyway, best home chefs says it’s okay to squeeze.
When is the jelly set?
The collected juice cooks with sugar like ordinary jam, using 2 scant cups of preserving sugar for every 1 pint of the juice.
How to recognise when to jar the jelly? Tediously, with a jam thermometer. When it reaches 221F, it’s ready to decant. Note: it takes absolutely forever to go from about 210F to 221F, so don’t think ‘it’s almost there!’ and turn it off at that point – it will be too runny. Unless you like it runny.
The other method is the frozen plate trick: drop a blob of the jelly onto a plate that has been kept in the freezer while jelly cooks. Wait a moment and prod it: if it looks like jelly and feels like jelly, and most importantly tastes like jelly, it’s done.
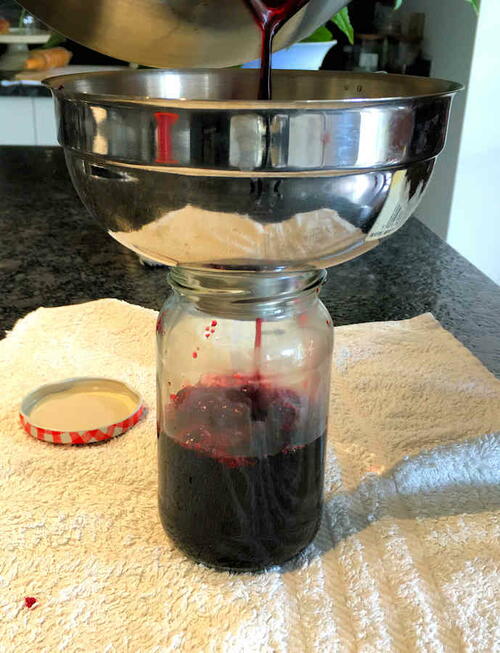
Let it rest about ten minutes in the pot before transferring into sterilised jars. It will mature in flavour and set a tiny bit more over a few days, if you can be so patient.
Can you use cultivated blackberries?
Absolutely yes. Especially if you’re a lucky gardener with plenty of happily fruiting blackberry canes and a bumper crop. The jelly will be a real joy to make!
Can you use ordinary granulated sugar?
Yes. It might mean cooking the jelly a little longer though. Alternatively, use granulated sugar and the pectin powder sold in little sachets, in the quantity advised on the package.
Ingredients
- 2 pounds blackberries
- 1 1/4 quart (5 cups) preserving sugar (not all may be needed)
- You will also need a jelly bag or a large muslin cloth and a colander
Method
-
Wash the blackberries and place them in a heavy stock pot or jam pan with a little water – the residue from the washing will be enough. Bring them to the boil and simmer for about 20-25 minutes, until completely soft.
-
If you have a jelly bag, use it according to the instructions.
Otherwise place a colander over a tall pot (you can use the same pot you cooked the blackberries in, rinsed, while the blackberries have been decanted to a bowl). Make sure there is enough clearance between the colander and the bottom of the pan, so the juice can drip freely. Additional scaffolding using a cake pan ring or something similar might be useful. Line the colander with a double layer of muslin. -
Pour the blackberries into the bag or muslin cloth and leave to drip overnight.
-
The next day squeeze the bag with fruit pulp to maximise the yield and decant the juice to a measuring jug.
-
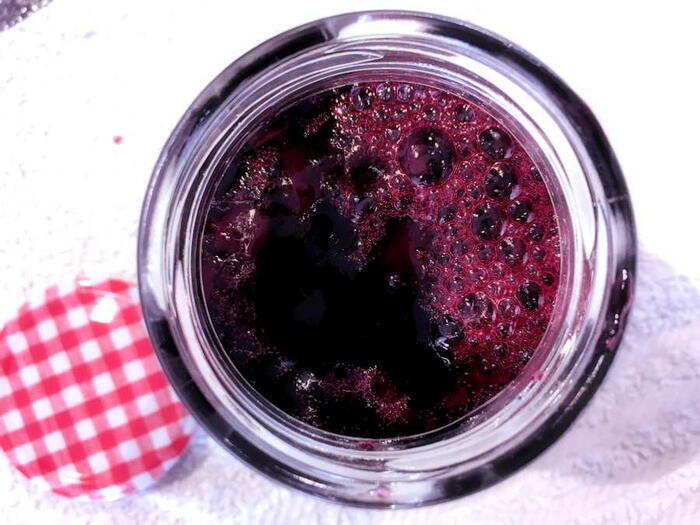
For every 1 pint of the juice use 2 scant cups sugar. Pour the juice and the sugar into the pot again and bring to a gentle simmer.
Let it cook for about 30-40 minutes until the temperature reaches 221F or a blob dropped onto an ice cold plate sets to a jelly consistency. You don’t need to skim the fruit scum from the surface but I only bother because it is such a delicious, instant gratification. -
While the jelly cooks, wash two 1-pint jars, Mason-type, in hot water. Place them in an oven heated up to 250F and immediately switched off.
-
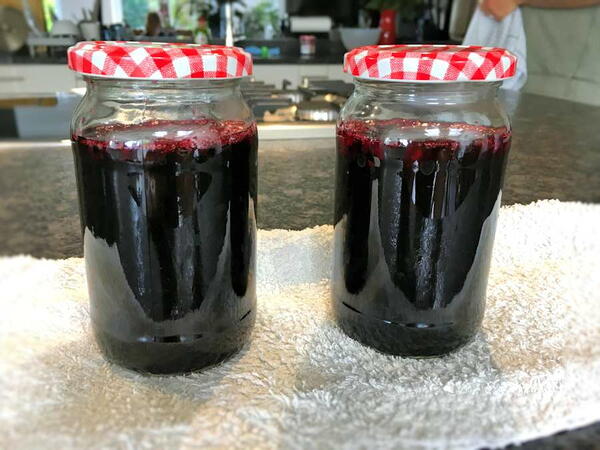
When the jelly is ready leave it to slightly cool down, about 10 minutes, and then carefully fill the jars. Close them tightly and leave for at least a few days to mature before eating.
Notes
Jelly canned in this way will keep for at least 6 months kept in the cupboard. Once opened, you’d best keep the jar in the fridge and use clean utensils to spoon it.
If you wish to make sure the jars are thoroughly sterilised, for longer storage, sterilise them in the microwave. Place them in the microwave while still wet from washing and turn on 'high' (usually around 1,000 watts) for 30-45 seconds.
Read NextStrawberry Applesauce Recipe