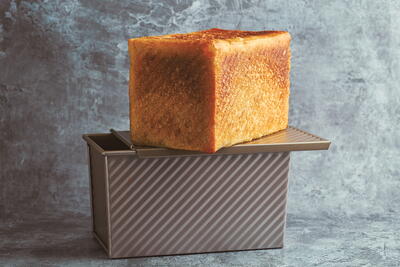
Same Day Perfectly Square Soft Sandwich Loaf

Pullman loaf pans produce an all-over square-edged loaf perfect for sandwiches and toast. This version is made with the addition of potato flakes in the dough, which add a softness to the baked loaf. If you do not have potato flakes, milk powder works perfectly instead. This recipe was designed to be made in one day, but the dough can be refrigerated overnight and baked the following morning if life gets in the way.
Equipment: A Pullman loaf pan, external size 8½ x 5 x 4½ inches (21.5 x 12.5 x 11.5 cm), lined with parchment paper or lightly sprayed with a neutral or flavorless oil.
Location: Use a warm place to proof the dough. I use my oven with the pilot light on and the door propped open, which creates an even temperature of 77°F (25°C). Alternatively, use a proofing box.
Makes1 standard loaf
Ingredients
- 100 grams (1/2 cup) active starter
- 350 grams (1 1/2 cups) warm water, around 100°F (38°C)
- 425 grams (3 1/2 cups) strong white bread flour
- 25 grams (1/4 cup) dried potato flakes or milk powder
- 7 grams (1 tsp) salt, or to taste
DIRECTIONS
-
In a medium-sized mixing bowl, roughly mix together all the ingredients until you have a shaggy, rough dough. The dough will be sticky. Cover the bowl with a clean shower cap or your choice of cover and leave the bowl in your chosen warm spot.
-
After half an hour, perform the first set of pulls and folds until the dough feels less sticky and comes together into a soft ball. This will be a warm, soft, stretchy dough. Cover the bowl again and place it back in the warmth.
-
After half an hour, perform the next set of pulls and folds; the dough should be nice and stretchy and bouncy, and it will come together into a smooth, soft ball. Place the covered bowl back in the warmth for another 30 minutes.
-
Perform the last set of pulls and folds; the dough should come together into a nice, smooth, bouncy ball. Place the covered bowl back in the warmth for the next 3 hours, or until the dough has doubled in size.
-
Once the dough is double its original size—it may be soft from the warm proofing, but it should not be floppy—gently but firmly perform a set of pulls and folds on the dough to pull it into a ball. Place the dough, smooth side down, into your prepared pan. Cover the pan with the same cover and place it back in your warm place until the dough grows up to an inch (2.5 cm) below the top edges of the pan. This will take 1½ to 2 hours. This step can also be done in the fridge for a longer, slower second proof—up to 24 hours—and can then be baked directly from the fridge.
-
When you are ready to bake, decide whether you would like to bake in a preheated oven or from a cold start. If preheating, set the oven to 350°F (180°C) convection or 400°F (200°C) conventional.
-
If you preheated the oven, put the lid on the pan and bake it for 45 minutes. If you are using a cold start, place the covered pan of dough in the oven, set the temperature as above and set a timer for 50 minutes.
-
Remove the loaf from the oven and the pan, tap the base of the loaf and if it sounds hollow, the loaf is baked. If not, return it to the oven, out of the pan, directly onto the rack to bake it for a further 5 to 10 minutes. Remove it from the oven and allow it to cool on a wire rack for at least an hour before slicing.
Read NextThree Ingredient Biscuits