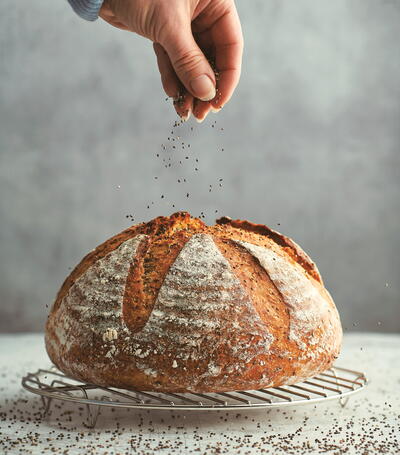
Same Day Chia Seed Boule

This recipe will enable you to make a loaf from scratch within a day, while also using more water than other loaves. However, do not fear a “higher hydration” dough. The chia seeds will soak up some of the water and help to make this a very easy-to-manipulate dough, while producing a perfectly round baked loaf. This loaf is also made using a portion of whole wheat flour that will assist in making this a manageable dough while also enhancing the sourdough flavor.
Equipment: A round banneton, 8 inches (22 cm) in diameter and 3¼ inches (8.5 cm) deep, or a cloth-lined bowl dusted with rice flour. Set aside a medium-sized baking pan lined with parchment paper, plus a lid. My pan is a 10-inch (26-cm)-diameter enamel roaster pan.
Location: Use a warm place to proof the dough. I use my oven with the pilot light on and the door propped open, which creates an even temperature of 77°F (25°C). Alternatively, use a proofing box.
Makes1 standard loaf
Ingredients
- 100 grams (1/2 cup) active starter
- 375 grams (13/4 cups) warm water, around 100°F (38°C)
- 400 grams (3 1/4 cups) strong white bread flour
- 100 grams (3/4 cup) whole wheat flour
- 50 grams (1/4 cup) chia seeds
- 7 grams (1 tsp) salt, or to taste
- Rice flour, for dusting
DIRECTIONS
-
In the morning, using a medium-sized mixing bowl, roughly mix together all the ingredients, except the rice flour, until you have a shaggy, rough dough. The dough will be sticky. Cover the bowl with a clean shower cap or your choice of cover and leave the bowl in your chosen warm spot for 30 minutes.
-
After 30 minutes, perform the first set of pulls and folds, until the dough feels less sticky and comes together into a soft ball. This will be a warm and soft seed-speckled dough. Cover the bowl again and place it back in the warmth.
-
After half an hour, perform the next set of pulls and folds, repeating the same actions again; the dough should be warm and stretchy, and it should come together into an easy ball. Place the covered bowl back in the warmth.
-
After another half an hour, perform the last set of pulls and folds; the dough should come together into a nice, bouncy ball. Place the covered bowl back in the warmth for the next 3 hours, or until the dough has doubled in size.
-
Once the dough is double its original size—it may be soft from the warm proofing—perform one last set of pulls and folds to firmly pull the dough into a nice ball. Place your hand over the whole dough and lift it into the banneton, smooth side down. Sprinkle extra rice flour down the sides and over the top of the dough. Cover the banneton and place it in the fridge for at least 1 hour. It should now be early afternoon and you can decide whether you would like to bake the loaf for late afternoon or early evening.
-
When you are ready to bake, decide whether you would like to bake in a preheated oven or from a cold start. If preheating, set the oven to 425°F (220°C) convection or 450°F (230°C) conventional.
Remove the cover from the banneton, then place the parchment paper over the top of the banneton and put the pan upside down over the top of them both. With one hand under the banneton and one on the pan, turn it all over together to turn the dough out of the banneton and into the pan. Score the dome of dough.
-
If you preheated the oven, put the lid on the pan and bake it for 50 minutes. If you are using a cold start, place the covered pan of dough in the oven, set the temperature as above and set a timer for 55 minutes.
Remove the lid or cover 10 minutes before the end of the baking time. After the full baking time, remove the pan from the oven. If you feel that it is looking pale, place the pan with the loaf back in the hot oven, minus the lid, for 5 to 10 minutes to brown the loaf to the color of your choice.
-
Once it is baked, carefully remove the loaf from the pan, saving the parchment paper for next time, and allow the baked loaf to cool on a wire rack for at least an hour before slicing.
Read NextCheese Biscuits